How to Set Up an Auction
What You Need
- Basic auction details, such as date & time, a description, and your terms of sale.
- A selection of between 50 - 1,250 unique items you would like to sell.
- A spreadsheet to list the items. We recommend Microsoft Excel, Google Sheets, or Open Office.
- (if you do not intend to use drag & drop) An FTP program for sending images to us. We recommend Filezilla.
- Your preferred payment method to pay the listing fee and publish your catalog online.
Not ready to list your auction catalog yet? Announce your upcoming auction with an Auction Preview.
Step 1: Choose a Plan
After signing in, click Set Up New Auction from your Home Screen or select Auction Set Up on your Seller Dashboard:

This will give you the options to choose a Live Sale or an Auction Preview
 Select the appropriate payment plan and if it is a Live Sale or a Timed Sale
*If you do not see the correct payment plan or have questions on your listing options with us, please email sales@liveauctioneers.com
Step 2: Auction Details & Date
Auction Title
The name of your auction. Titles have a 49-character limit, including spaces. (Please do not include any special characters in your title).
Description
Character limit: 1,995. Add the most searchable words here to best describe your sale. For example: “Fine furniture sale featuring an 18th Century English Chippendale desk.” Tell us the main categories featured in the auction as well as any noteworthy items being offered. What would buyers search for to find your items?
Preview Period
When and where are your items available to view? Do you allow in-person viewings/exhibitions of all of your upcoming items? For example: “Preview on Sunday, October 4, or available for preview on LiveAuctioneers." HTML is not allowed in this field, which is limited to 2,000 characters.
Category
Choose the category that best describes your sale. We give you a list of 16 categories to choose from, but you can only select 1. Approximately 24 hours after your sale is uploaded, our system searches the catalog for keywords and designates each lot to a broad category that can be browsed by our bidders. This also triggers email alerts sent to bidders interested in the types of items you sell. Learn more about Optimizing your Auction for Search (SEO) here.
Auction Curators
List the specialists who curated this auction catalog. Learn More
“This catalog contains…”
If your catalog contains firearms, alcohol, or sexually explicit/offensive material please check the appropriate box. If it does not contain any of these simply check “None of the above”.

Auction Location
Enter the physical location where the auction is taking place. If your auction is online-only, enter your registered business address here.
Shipping Options
Select the shipping methods that best suits your auction house process. If you are interested in LiveShipping through LiveAuctioneers click here
Auction Date
This should refer to the date and time your first lot will close. In the traditional auction sense, this is the 'auction day' or 'start date'. You do not need to select a time for your auction to 'go live,' as it will be live for absentee bidding as soon as you publish your sale at the end of this guide.

Step 3: Auction Clerk
How will you clerk your sale on auction day?
Option 1: Live Sale (Manual Clerk)
- You are responsible for starting and clerking the auction.
- Broadcast your auction live. Select this if you are interested in broadcasting a live video stream on auction day. For more information on how to stream and what we recommend in order to stream, see the Video Setup Guide.
Option 2: Timed Sale (Automated Clerk)
LiveAuctioneers will automatically clerk, sell & progress lots. Bidding begins at the starting price you set for each item and progresses at pre-defined bidding increments. You may set reserve prices for each item in advance. If you wish to manually clerk your sale, do not select this option.

**Please note, if you are using the Timed Sale option, utilizing your Reserve Prices are important as this ensures that an item won't sell below its listed Reserve Price.
Step 4: Payment Options
How Winning Bidders Can Pay You
Select the payment methods you will accept from winning bidders. Your options are:
- LivePayments: The easiest way to instantly collect bidder payments from anywhere in the world. An online payment fee applies. Learn More or contact your account manager for more information.
- Online Payments Fee
- Absorb Online Payments Fee (fee is collected from the seller post auction and not added to the buyers invoice)
- Pass Online Payments Fee onto bidders
- Autopay: Automatically collect payments and decrease non-paying bidders
- Standard Autopay
- Instant Autopay
- Online Payments Fee
- Credit & Debit Cards: American Express, Discover, Visa / Mastercard
- Personal Check
- COD (Cash on Delivery)
- Money Order/Cashier Checks
- Wire Transfer
Currency
Choose the currency you will use to price your items. We recommend choosing a currency that is the same as your bank’s currency, as choosing a different currency may result in currency conversion fees.
Buyer’s Premium (Live Auction Only)
This is a service fee for which the buyer is responsible. Buyer's premium can be set from 0% up to the maximum of 5% above the buyer's premium charged to floor bidders (i.e. "in-house buyer's premium"). For instance, if your in-house buyer's premium is 20%, you may charge up to 25% to bidders on LiveAuctioneers.
Buyer's premium on LiveAuctioneers cannot exceed buyer's premium charged to bidders online elsewhere (e.g. on auctioneer's website), or other online marketplaces.
Note: Your in-house buyer’s premium was set when creating your seller’s account. If you need this to be changed, please contact support@liveauctioneers.com.

Step 5: Bid Increments
Set your bid increment table. This determines the amount each bid is increased by as the bidding progresses. Increments can be modified up until 2hrs before the start of the sale. After this time, your Internet clerk has the ability to adjust the bid increments on the day of the sale through the LiveAuctioneers seller’s console. You must set a minimum of 10 increments.

Step 6: Shipping, Payment, Terms & Invoice Message
Terms & Conditions
Your Terms & Conditions provide a brief description of what your buyers should expect when purchasing from your auctions.
Provide your buyers with important information about how you do business, such as:
- Shipping options
- Whether or not you offer cancellations
- What types of payments you accept
These policies are designed to protect you as a seller as well as your bidders. By providing policies that are safe, fair, and respectful, you can offer assurance and instill confidence in your buyers.
Invoice Message:
Your invoice message will appear on the bottom of the invoice that is emailed directly to your buyers. Keep this succinct and only include the most important payment and shipping information:
- Whether you have a payment deadline
- What types of payment you accept (if you are not using LivePayments)
- The best way to complete payment (if you use LivePayments, please reference our Guidelines & Best Practices)
- Shipping and pickup information
You will be able to update and edit your invoice message during the auction setup process and while your catalog is online. Your Invoice Message can be found in your auctioneer dashboard under your auction > Auction Details > Policies.

Congratulations! The setup form is complete.
P.S. The universal cut-off time for edits to the auction details is 2 hours prior to the commencement of the sale. This excludes the Buyer's Premium and Terms & Conditions. These cannot be edited once the sale is live online.
Remember: You can save your auction at any point, and publish it at a later date. Go to the Pre Auction tab for the list of your pending catalogs.

Step 7: Upload Items
You can add items one-by-one, or use a spreadsheet to upload all items at once. We provide a sample items file to download in Excel .XLSX format. Other supported file formats: Comma Separated Values (.CSV) and tab-delimited text (.TXT).

See How to Format Your Catalog Spreadsheet for Upload.
**If using auction software (e.g. RFC, BidMaster, AuctionFlex), you can build a text file in the software and export it as a CSV file for direct upload into LiveAuctioneers. Please contact your respective inventory management software company. **
Click the Choose File option, and select the spreadsheet saved to your computer.

Click the Upload button, and see your spreadsheet appear below.
If there are errors, these will appear in a list or in red on text preview:

Correct these errors by going back to your spreadsheet and making the necessary edits, then saving. Common errors include incorrect column headers, missing estimates, or extra rows hiding at the bottom of the spreadsheet.
Upload the corrected spreadsheet, and click Save Items.
Step 8: Upload Images
You can add images individually or upload in bulk. Take a look at our photo guides to learn about the required image formats, how to use our Drag and Drop feature, or how to set up your FTP program.

If using an FTP Program, once you upload your photos, send an email to support@liveauctioneers.com with the subject line "Auction House Name] - Image upload complete" as the subject line.
Step 9: Choose Your Cover Lots & Featured Items
Choose three items to feature on the liveauctioneers.com. These are the photos that buyers will see first so make sure you choose the best pieces in your sale.
You can also upgrade your Feature Items, which will promote your chosen 5 or 20 lots, for the 7 days leading up to your sale. This is an additional $325 for 5 items or $935 for 20 lots and is only available when choosing your cover lots.

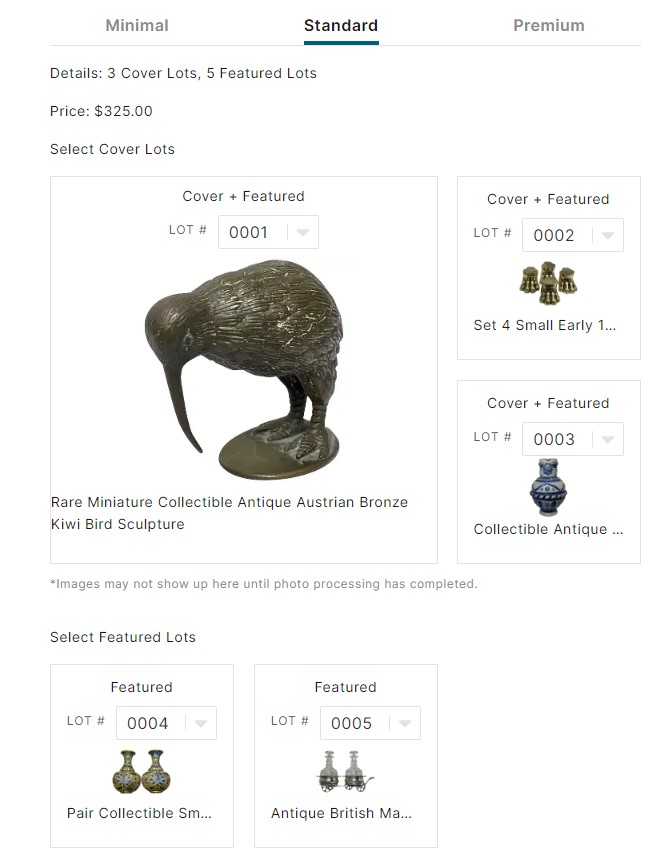
These lots will appear at the top of search and category pages as Featured Lots for the 7 days leading up to your sale date!
Click Save Items.
Step 10: Complete Your Payment
Payment
This is where you pay for the listing fee. Either complete the payment form on this page or email finance@liveauctioneers.com with the receipt from the wire transfer, PayPal, or other accepted payment option.
Click Confirm Payment.
Step 11: Proof Your Catalog
Preview
Click Preview to see how your catalog will look like to bidders.
Publish
You’re ready to post your sale online! Read through the LiveAuctioneers Terms & Conditions carefully, scroll to the bottom, and click Accept Agreement.

And now Approve Auction!
Congratulations! Your sale is now live.
What’s next?
Read our information on how to approve bidders here.